
Saturday, February 22, 2014
JVM
Java Provides two types of HotSpot Java Virtual Machine
client VM : client VM is tuned for reducing startup time and memory footprint by invoking the -client JVM .
server VM : server VM is designed for maximum program execution speed by invoking the -server JVM.
JDK :JDK is a collection of tools for deleloping java applications .we can compile programs written in java and run them in jvm.
JRE:JRE consistes java platform core classes and supporting java platform libraries to run java applicaiton on your computer .
JVM :JVM is platform independent execution environment that converts java byte code to machine language and executes .
Thursday, February 13, 2014
Weblogic Installation - Installers - Types - Methods - System Requirements
Types of Installers :
1)OS - Specific Installers. (.exe .bin)
2)Generic Installers - This installer does not contain jdk's.
3)Upgrade Installers - Patches .
Installtion Methods :
1)Graphicl Mode Installation .
2)Console Mode Installtion (filename -mode=console).
3)Silent Mode Installation (filename -mode=silent -silent_xml= path of the silent.xml file .
Installation Types :
1)Typical Type.
2)Custom Type .
Default Domain Template : WL_HOME/common/templates/domain/wls.jar contains default configuratin of domain template .
System Requirements :
support Platforms.
Processor -- 1 GHz CPU.
Hard Disk -- 3.9 GB.
Memory 1 GB -- Recommeded 2 GB.
JDK
Saturday, February 8, 2014
Reverse Proxy and forward Proxy
What is proxy server ?
Proxy servers is a server receive requests from client and it will forward the request to the origin servers.
Proxy server act as intermidiary between client and other origin servers .
Type of proxy servers :
Reverse proxy :
1)Reverse proxy is a proxy server used to pass the requests from the internet to a private network(intranet).
2)Reverse proxy servers also loadbalancing capabilities to number of backend servers
3)Reverse proxy can also lessen network traffic by servering cached information rather than passing all request to backend server by enabling cache
Forward Proxy :
1)Forward proxy is a proxy server used to pass the requests from the private network(inranet) to internet .
Proxy Chaining :
1)A Proxy chain uses two or more proxy servers .
2)Proxy chaining is not a type of proxy but a use of reverse and forward proxy acress multiple networks.
Sunday, January 26, 2014
Tomcat Installation in windows and unix
Tomcat Installation ways for running on different platforms :
Tomcat Installation in windows :
1)Installing Tomcat on Windows using the Windows installer.
It's a Wizard base interface and functionality is similar to other wizard based installers. .
Installation as a service: Tomcat will be installed as a Windows service Using the checkbox on the component page sets the service as "auto" startup.
Tray icon: When Tomcat is run as a service, there will not be any tray icon present when Tomcat is running. the tray icon will be used even if Tomcat was installed as a service.
2)Installing Tomcat in windows exatracing the zip file : you can download the tomcat zip file from the apache tomcat mirror and Extract the tomact zip file .
Tomcat Installation on unix :
you can download the tomcat source tarball (apache-tomcat-7.0.50.tar.gz) from the apache tomcat mirror and Extract the tomact zip file as below .
gunzip apache-tomcat-7.0.50.tar.gz
tar -xvf apache-tomcat-7.0.50.tar
Tomcat Configuration Files
As a Tomcat administrators you must familiarize yourself some of the concepts and files about Tomcat Container .
Tomcat Directories and Files :
1)bin - Startup, shutdown, and other scripts.
2)conf - Configuration files and related DTDs. (server.xml , tomct-users.xml , content.xml)
server.xml : The most important file in here is server.xml. It is the main configuration file for the Tomcat container.
tomct-users.xml : Users are defined in tomcat-user.xml file to access the tomcat container manager webapp .
content.xml : The contents of this file will be loaded for each web application .
3)logs - Log files are here by default.
4)webapps - Webapps folder is for deploying you webapps .
All configuration files is read at container startup, that any change to the files restart of the container is necessary to reflect the changes .
Tomcat Installation : http://jeeservers.blogspot.in/2014/01/tomcat-installation-in-windows-and-unix.html
Saturday, January 25, 2014
Jenkins Disable Security realm
1)Stop Jenkins server .
2)Edit the config.xml under $JENKINS_HOME.
3)Look for the useSecurity element in the config.xml file.
4)Replace true with false and Remove the elements authorizationStrategy and securityRealm.
5) Start Jenkins server.
When Jenkins comes up, you will get full access of the system.
Wednesday, January 22, 2014
Iplanet Custom Error pages
It is better to send Custom Error page response to Client when webserver encounters the error instead of default Error Pages .
Coming to Iplanet webserver , Error handling is a part of the Request handling process .
Error Directive executes When ever the Iplanet webserver encounters the error during Request process
The following statements are included in the obj.conf file to provide custom Error page for 404 and 500 .
Add the below entry in obj.conf to proivde custom error page for 404 Errors .
Error fn="send-error" code="404" path="D:/webservicesm/IPLANET/https-webservicesm/docs/404status.html"
Add the below entry in obj.conf to proivde custom error page for 500 Errors :
Error fn="send-error" code="500" path="D:/webservicesm/IPLANET/https-webservicesm/docs/500status.html"
Tuesday, January 21, 2014
TCP connection states
| STATE | EXPLANATION |
| SYN_SEND | Indicates active open |
| SYN_RECEIVED | Server just received SYN from the client |
| ESTABLISHED | Client received server's SYN and session is established |
| LISTEN | Server is ready to accept connection |
| FIN_WAIT_1 | Indicates active close |
| FIN_WAIT_2 | Client just received acknowledgment of its first FIN from the server |
| TIMED_WAIT | Enters this state after active close |
| CLOSE_WAIT | Indicates passive close. Server just received first FIN from a client |
| LAST_ACK | Server is in this state when it sends its own FIN |
| CLOSED | Server received ACK from client and connection is closed |
java.lang.ClassCastException: weblogic.net.http.SOAPHttpsURLConnection
ERROR : java.lang.ClassCastException: weblogic.net.http.SOAPHttpsURLConnection
The above error may occur while making a HTTP(s) connection to external resource from weblogic server because underline API uses weblogic implementation .
weblogic.net.http.HttpsURLConnection : This class is used to represent a HTTP with SSL (HTTPS) connection to a remote object.
To Overcome the above issue Add the below flag in jvm argument to tell the weblogic server to use the Sun API Http Handlers instead of weblogic API
-DUseSunHttpHandler=true
Change the websphere plug-in log file with out restarting a web server
Normally if you want to delete, move or rename websphere web server plug-in log file, you must stop and start the web servers but UNIX systems to manually switch the web server plug-in over to a new log file, without having to stop the web server using the below steps
1 ) Go to the plug-in logs directory and create a new log file by using the touch command .
2 ) Change the permissions on the new file to 766.
3) Edit the plugin-cfg.xml file and change the log filename to the new filename.
4) Websphere plug-in instance will automatically switch over to the new log file name after "RefreshInterval".
5)Do not edit or delete the old plug-in log file for several minutes as it might still be in use by web server processes.
NOTE :
1) If you are using a multi-processed web server, there is no way of telling when a process will start using the new plug-in log file, because it is triggered from processing a request .
2 After all plug-in instances have switched over to the new log filename, you can delete, move, rename, or zero-out the old plug-in log file, if you want.
Friday, January 17, 2014
Step by step Enabling CGI configuration in Tomcat 6
1)The CGI is a way for a web server to interact with external content-generating programs, which are often referred to as CGI(Common Gateway Interface) programs
2)CGI support can be added when you are using Tomcat as your HTTP server and require CGI support.
3)Tomcat CGI support is implemented using the servlet class org.apache.catalina.servlets.CGIServlet. This servlet is mapped to the URL pattern "/cgi-bin/*".
Note : By default CGI support is disabled in Tomcat.
How To Enabe CGI (Common Gateway Interface) :
1) Uncomment the CGIServlet from web.xml file under TOMCAT_HOME/CONF folder that's commented by default .

2) Uncomment mapping for the CGI Gateway servlet from web.xml file under TOMCAT_HOME/CONF folder that's commented by default .

3) Add the priviliged ="true" in context.xml file under TOMCAT_HOME/CONF folder.

Note : you may see the below eror if you not added priviliged ="true" in context.xml .
PM org.apache.catalina.startup.HostConfig checkResources
WARNING: Error during context [] restart
java.lang.SecurityException: Servlet of class org.apache.catalina.servlets.CGIServlet is privileged and cannot be loaded by this web application
at org.apache.catalina.core.StandardWrapper.loadServlet(StandardWrapper.java:1146)
at org.apache.catalina.core.StandardWrapper.load(StandardWrapper.java:993))
4) Restart the Tomcat server to Pick up the new configuration
5) Create a cgi folder under your webapps/xxxx/WEB-INF and place your CGI scripts in cgi folder .
6) access the url http://webservicesm.blogpsot.in:8080/cgi-bin/test.pl
2) Uncomment mapping for the CGI Gateway servlet from web.xml file under TOMCAT_HOME/CONF folder that's commented by default .
3) Add the priviliged ="true" in context.xml file under TOMCAT_HOME/CONF folder.
Monday, January 13, 2014
iplanet Request-Handling Process (obj.conf):
iplanet obj.conf Request-Handling Process :
When Web Server first starts up, it performs some initialization tasks and then waits for an HTTP request from a client (such as a browser). When the server receives a request, it first selects a virtual server. The obj.conf file of the selected virtual server determines how the server handles a request.
The obj.conf file contains a series of instructions known as directives that tell the server what to do at each stage in the request-handling process as below
1.)AuthTrans (authorization translation) : Verify the authorization information (such as name and password) sent in the request.
2.)NameTrans (name translation): Translate the logical URI into a local file system path.
3.PathCheck (path checking): Check the local file system path for validity and check if the requestor has access privileges to the requested resource on the file system.
4.ObjectType (object typing): Determine the Multipurpose Internet Mail Encoding (MIME) type of the requested resource (for example, text/html, image/gif, and so on), and establish other resource-specific settings.
5.Input (prepare to read input): Select filters that will process incoming request data read by the Service step.
6.Output (prepare to send output): Select filters that will process outgoing response data generated by the Service step.
7.Route (request routing): Select the server to service the request.
8.Service (generate the response): Generate and return the response to the client.
9.AddLog (adding log entries):Add entries to log files.
Source :http://docs.oracle.com/cd/E19146-01/821-1827/abvag/index.html
Tuesday, January 7, 2014
Disabling admin console security for WebSphere Application Server
Disabling global security in the WebSphere Application Server
1) using Websphere Admin console
2) By Editing security.xml file
Procedure :To disable global security, using websphere admin console
1)Login into admin console .
2)Go to the below Navigation
Security--->Global Security--->Administrative security---uncheck the check box
3)Restart the WebSphere Application Server. Global security is now disabled.
Procedure :To disable global security, edit the security.xml file
1)Locate the security.xml file. The file is in the following directory:
WAS_NODE_PROFILE_HOME/config/cells/webservicesm
where WAS_NODE_PROFILE_HOME is the directory of the WebSphere Application Server, and webservicesm is the name of the cell .
2)Edit the security.xml file
Search for the line that begins with the following tag security:Security
In that line, search for the enabled attribute, and change the value to false .
3)Save the security.xml file.
4)Restart the WebSphere Application Server. Global security is now disabled.
HTTP3360: connection limit (xxx) exceeded in iplanet
Where xxx is the queue-size limit for the maximum number of concurrent HTTP connections that can be queued waiting for processing.
The server may also experience a hang or performance slowdown when receiving the HTTPP3360:connection limit (xxx)exceeded
What does the HTTP3360 error mean?
The connection limit is the same thing as the maximum number of threads that are set in the Connection Queue for incoming HTTP requests to be queued waiting for servicing. This is configurable via the thread-pool subelement queue-size via the server.xml configuration file
What is the Connection Limit?
The connection limit is the maximum number of ready connections that can be stored in the Connection Queue for incoming HTTP requests to be queued waiting to be serviced by a worker thread. This connection limit is configurable via the server.xml element thread-pool and its subelement queue-size .
In Oracle iPlanet Web Server 7.0 however, there is not a set default value for queue-size. The queue-size value is determined by the web servers auto-tune algorithm.
Since Web Server 7.0u2, the web server has been enhanced to automatically size the connection queue size and other server variables based on the number of file descriptors that are set on the operating system. The other variables affected by the auto detect feature is the keep-alive maximum number of connections and the maximum files for the file cache. The purpose of this enhancement is to allow the server to maximize and properly partition the file descriptors among the web server subsystems for maximum performance.
Possible Causes :
Here are some possible causes of the "Connection Limit (xxx) exceeded" message:
1. The connection queue limits may be reached as a result of an under tuned web server where the file descriptor limits have not been set for optimal server performance. In this case, we recommend sizing studies be done to determine what is the optimal thread settings to be set on the web server.
2. There may be slow response times from a specific application running on the web server which might result in incoming connections queue up. Eventually, the server reaches a point where all threads on the server are occupied and processing requests a full hang condition occurs.
3. For Web Server versions prior to 7.0u7, there was an auto-tuning bug which would auto tune the queue-size to 1.
Monday, January 6, 2014
Websphere Application Server Multiple Data Centers for High Availability
Active/Passive:
1)One data center is serving requests, the other is not performing work but is standing by in case it is needed. Application data and applicationstate are replicated asynchronously between data centers so that when an outage occurs, failover to the surviving data center can be accomplished quickly witha minimal outage (minimal could mean some number of minutes or even a few hours in this context).
2)It is the easiest and safest to implement since only one is serving requests -- but it is also the most expensive, at least in termsof hardware, since you have two data centers with 100 percent capacity
Active/Active:
1)Both data centers are serving requests. Because each data center is active, application data (minimally) and application state (possibly) must be shared between the data centers, and replication of the application data and application state needs to be synchronous, with a minimal latency, in order to avoiding consistencies.
2)It is slightly more complex than Active/Passive -- but with some additional effort, it can work in a reliable manner .
Reformed Active/Active:
1)The key difference in this variation to Active/Active is that the data centers do not share application state and, if possible, there is no sharing of application data -- or it is at least minimized, if it can't be avoided altogether. For this to work, you need to provide affinity for requests to a specific data center, which is best accomplished with a network switch that distributes the load to the data centers (which, naturally, means it doesn't reside in either data center).
2)is the most complex topology to implement; to do so requires a sizable investment in suitable network capacity between the data centers.
Source : http://www.ibm.com/developerworks/websphere/techjournal/0707_col_alcott/0707_col_alcott.html
Sunday, January 5, 2014
Websphere Commerce Technology
 Source : http://www-01.ibm.com/software/commerce/websphere-commerce/technology-partners/
WebSphere Commerce V7.0, System Administration
Architecture : a.Identify components of IBM WebSphere Commerce and how IBM WebSphere Commerce integrates with other products. b.Describe supported system topologies and available IBM WebSphere Commerce Editions. c.Describe IBM WebSphere Commerce component architecture (e.g., data load, payment, etc.) Installation, Configuration and Migration : a.Describe hardware and software requirements for IBM WebSphere Commerce V7.0. b.Install development, staging, authoring and runtime environments in both single and multi-tier environments. c.Create and configure IBM WebSphere Commerce instances using IBM WebSphere Commerce Configuration $Manager and command line tools. d.Perform migration to IBM WebSphere Commerce V7.0 using the migration tools. e.Verify and troubleshoot the installation, configuration and migration tasks. f.Demonstrate how WebSphere Commerce supports globalization. Set up and Administer IBM WebSphere Commerce Stores : a.Compare and contrast the steps necessary to publish a store using the Publish Wizard versus the publishstore utility. b.Apply the concepts of store archives and store assets, and describe which store models are available. c.Publish a store to support a business model and verify its functionality. d.Manage organizations, groups, users and roles. e.Configure store features such as store flow, store style, email activity, marketing and promotions. f.Configure scheduler jobs to support store features. g.Create and configure message types and transport methods. h.Build, package, deploy and verify custom assets. i.Use WebSphere Commerce staging and data load utilities. j.Describe the different catalog management tools and their uses. k.Demonstrate knowledge of workspaces. l.Enable and configure Social Commerce, Mobile Commerce, and Gift Registry. m.Configure payment plug-ins and payment rules. Maintain and Monitor IBM WebSphere Commerce a.Install fixes, fix packs and feature packs. b.Describe the logging services and identify the logs available in WebSphere Commerce. c.Use of database cleanup utility. d.Configure scheduler jobs for site-level activities. e.Backup resources for disaster recovery. Security and Auditing a.Describe WebSphere Commerce security and authentication model. b.Demonstrate how to enable different levels of WebSphere Application Server Security. c.Configure and manage access control. d.Configure WebSphere Commerce security using LDAP, SSL and Single Sign-On (SSO). e.Apply business auditing features. f.Configure WebSphere Commerce implementation to address PCI-DSS (PCI Data Security Standard). Performance Tuning : a.Apply recommended JVM settings for WebSphere Commerce sites. b.Configure Dynamic caching and use the Cache Monitor tool to administer it. c.Monitor performance using WebSphere Commerce Performance Monitoring Infrastructure (PMI) module. d.Illustrate database performance tuning options. e.Apply WebSphere Application Server optimization techniques. f.Perform clustering for high availability and load-balancing. Support and Troubleshooting : a.Perform troubleshooting of WebSphere Commerce and its software components. b.Use logs and traces for problem determination. c.Use data in WebSphere Commerce database tables for troubleshooting. d.Troubleshoot payment processing issues. e.Use of IBM self-help tooling for support and troubleshooting. f.Demonstrate understanding of IBM Software Support.Wednesday, January 1, 2014
Create a Boot Identity File by using java weblogic.Server for an Administration Server
Boot Identity File by using java weblogic.Server for an Administration Server :
Note: Use this technique only if you invoke the java weblogic.Server command from the command line. If you use a script to start an Administration Server
Oracle recommends that we do not use the technique described in this section for the following reasons:
It requires we to store an unencrypted password in the startup script.
Each time we run the script, the server boots with the supplied user credentials and then creates a new boot identity file
we can create a boot identity file by invoking the weblogic.Server class directly on the command line and including the following options in the Java command:
-Dweblogic.management.username=our username
-Dweblogic.management.password=our password
-Dweblogic.system.StoreBootIdentity=true These options cause the server instance to boot with the supplied user credentials and then store them in a file named boot.properties
For example, the following command starts an Administration Server named myAdminServer and creates a boot identity file:
java -Dweblogic.management.username=weblogic
-Dweblogic.management.password=weblogic
-Dweblogic.system.StoreBootIdentity=true
-Dweblogic.Name=myAdminServer weblogic.Server
For more information about invoking the weblogic.Server class directly from a command line,see weblogic.Server Command-Line Reference in Command Reference.
Integration process for Apache to weblogic
* We have to downloaded and install weblogic serverApplication server, Apache webserver from the official websites
* We want to install apache plug-in file,so that we can avoid port number when accessing the deployed applications
* The steps given below should work for apache 2.x
1. Download the apache server plug in for weblogic from : http://download.oracle.com/otn/bea/weblogic/server103/WLSWebServerPlugins1.0.1150354-Apache.zip
2. Extract the zip file into your hard disk
3. Make sure you have necessary modules in the extracted zip folder
For eg: mod_wl_220.so under windows folder
4. Verify that plug-in mod_so.c is enabled by typing the following command
$APACHE_HOME \bin\apachetl –l (Unix/linux)
Or
$APACHE_HOME \bin\httpd –l (windows)
Where APACHE_HOME is the directory containing your Apache HTTP Server installation
This lists all enabled modules. If mod_so.c is not listed, you must rebuild apache server to have it enabled
5. Install the Apache HTTP Server Plug-In module for Apache 2.0.x by copying the mod_wl_22.so file to the $APACHE_HOME\modules directory
6. Add the following line to your APACHE_HOME/conf/httpd.conf file manually:
LoadModule weblogic_module modules/mod_wl_22.so
7. Modify the ServerName as your machine ip address.
8. Add the following lines:
WebLogicHost ip_address
WebLogicPort 7001
SetHandler weblogic-handler
10. Verify the syntax of the httpd.conf file with the following command:
$APACHE_HOME\bin\apachectl -t
The output of this command reports any errors in your httpd.conf file or returns:
Syntax OK
11. Re-start Apache server.
12. Test everything by hitting the URL below in the browser:
http://servername/application_name/
Weblogic 11G installation steps in consolemode
Choose BEA Home Directory:
--------------------------
"BEA Home" = [D:\bea]
Use above value or select another option:
1 - Enter new BEA Home
2 - Change to default [C:\bea]
Enter option number to select OR [Exit][Previous][Next]> 1
<--------------- Oracle Installer - WebLogic Platform 10.3.0.0 --------------->
Choose BEA Home Directory:
--------------------------
"BEA Home" = [D:\bea]
Enter new BEA Home OR [Exit][Previous][Next]> next
<--------------- Oracle Installer - WebLogic Platform 10.3.0.0 --------------->
Choose Install Type:
--------------------
Select the type of installation you wish to perform.
->1¦Complete
¦ Install the following software products and examples:
¦ - WebLogic Server
¦ - Workshop
2¦Custom
¦ Choose software products and components to install and perform optional
¦configuration.
Enter index number to select OR [Exit][Previous][Next]> 1
<--------------- Oracle Installer - WebLogic Platform 10.3.0.0 --------------->
Choose Product Installation Directories:
----------------------------------------
BEA Home Directory: [D:\bea]
Product Installation Directories:
1¦WebLogic Server: [D:\bea\wlserver_10.3]
2¦Workshop: [D:\bea\workshop_10.3]
Enter index number to select OR [Exit][Previous][Next]> 1
<--------------- Oracle Installer - WebLogic Platform 10.3.0.0 --------------->
Choose Product Installation Directories:
----------------------------------------
"WebLogic Server" = [Enter new value or use default "D:\bea\wlserver_10.3"]
Enter new WebLogic Server OR [Exit][Previous][Next]> next
<--------------- Oracle Installer - WebLogic Platform 10.3.0.0 --------------->
Choose Product Installation Directories:
----------------------------------------
BEA Home Directory: [D:\bea]
Product Installation Directories:
1¦WebLogic Server: [D:\bea\wlserver_10.3]
2¦Workshop: [D:\bea\workshop_10.3]
Enter index number to select OR [Exit][Previous][Next]> 2
<--------------- Oracle Installer - WebLogic Platform 10.3.0.0 --------------->
Choose Product Installation Directories:
----------------------------------------
"Workshop" = [Enter new value or use default "D:\bea\workshop_10.3"]
Enter new Workshop OR [Exit][Previous][Next]> next
<--------------- Oracle Installer - WebLogic Platform 10.3.0.0 --------------->
Choose Product Installation Directories:
----------------------------------------
BEA Home Directory: [D:\bea]
Product Installation Directories:
1¦WebLogic Server: [D:\bea\wlserver_10.3]
2¦Workshop: [D:\bea\workshop_10.3]
Enter index number to select OR [Exit][Previous][Next]> next
<--------------- Oracle Installer - WebLogic Platform 10.3.0.0 --------------->
Choose Shortcut Location:
-------------------------
*The installer creates shortcuts to BEA components, samples, and tools. As
*a user with administrative privileges, you can specify where these
*shortcuts are created.
->1¦"All Users" Start Menu folder (recommended)
¦For some installations, this setting may limit the automatic creation of
¦server shortcuts for users without administrative privileges. Refer to the
¦documentation for more information.
2¦Local user's Start Menu folder
¦Select this option if you need to ensure that other profiles registered on
¦this machine will not have access to these shortcuts.
Enter index number to select OR [Exit][Previous][Next]> 1
<--------------- Oracle Installer - WebLogic Platform 10.3.0.0 --------------->
Choose Shortcut Location:
-------------------------
*Are you sure you wish to create the shortcuts in the selected location?
*
*"All Users" Start Menu folder (recommended)
*For some installations, this setting may limit the automatic creation of
*server shortcuts for users without administrative privileges. Refer to the
*documentation for more information.
->1¦Yes.
2¦No, Go back to the previous screen and make another choice.
Enter index number to select OR [Exit][Previous][Next]> 1
<--------------- Oracle Installer - WebLogic Platform 10.3.0.0 --------------->
The following Products and JDKs will be installed:
--------------------------------------------------
WebLogic Platform 10.3.0.0
+----WebLogic Server
¦ +----Core Application Server
¦ +----Administration Console
¦ +----Configuration Wizard and Upgrade Framework
¦ +----Web 2.0 HTTP Pub-Sub Server
¦ +----WebLogic JDBC Drivers
¦ +----Third Party JDBC Drivers
¦ +----WebLogic Server Clients
¦ +----WebLogic Web Server Plugins
¦ +----UDDI and Xquery Support
¦ +----Server Examples
+----Workshop
¦ +----Workshop for WebLogic
¦ +----Workshop Runtime Framework
+----JDKs
+----Sun SDK 1.6.0_05
+----BEA JRockit 1.6.0_05 SDK
*Estimated size of installation: 1,107.0 MB
Enter [Exit][Previous][Next]> next
<--------------- Oracle Installer - WebLogic Platform 10.3.0.0 --------------->
Installing files..
0% 25% 50% 75% 100%
[------------|------------|------------|------------]
[***************************************************]
Tuesday, December 31, 2013
ClassPath
ClassPath : Classpath is a parameter, it search for the classes and other resource files in the Java Virtual Machine or the Java compiler where to look for user-defined
* ClassPath can be present at drive/folder/subfolder ..
* Java compiler or runtime environment won’t be able to find the classes unless they are somewhere in the class path
* Multiple entries in the class path are separated by a semicolon on Windows (;) and by a colon on UNIX (:)
* To limit the search to particular locations, Operating System Environment variable CLASSPATH is being used
we can set classpath in following ways:
1.command-line window or Shell --> Temporarily
2.Setting Permanently at the System level (ex. in .profile file) in unix
3. environment variable settings in windows -->Permanently
4.At runtime by specifying the class path each time you start your Java application and the JVM in Unix --> Temporarily
5.Setting the path in Manifest file
Certificate chain received from host failed hostname verification check
Error in logs:
#### <[ACTIVE] ExecuteThread: '1' for queue: 'weblogic.kernel.Default (self-tuning)'> <> <> <1377783231166>
#### <[ACTIVE] ExecuteThread: '1' for queue: 'weblogic.kernel.Default (self-tuning)'> <> <> <1377783231373>
Solution :
1)If you are accessing the application from your corportate intranet .
To Resolve the issue add the below command line parameter in serverstart(weblogic console) and restart the weblogic server .
-Dweblogic.security.SSL.ignoreHostnameVerification=true
2)If you are accessing the application from internet.
To Resolve the issue add the below command line parameter in serverstart(weblogic console) and restart the weblogic server .
-Dhttps.proxyHost=http-proxy.webservicesm.com -Dhttps.proxyPort=88
Websphere Commmerce Compiling JavaServer Page files
Websphere Commmerce Compiling JavaServer Page files using JspBatchCompiler.sh
Compiling the JavaServer Page (JSP) files in your site or store will significantly reduce the amount of time needed to load your store .
As a result, it is recommended that you batch-compile your store or site JSP files after publishing a store archive and after deploying JSP files to a production environment.
If you are deploying Java EE assets, and those assets contain JSP files, ensure you compile your JSP files. Regardless of whether you deploy a single file, a partial application, or an entire module, you should do this if there are JSP files involved.
Procedure :
1)Go to the following directory: WC_profiledir/bin
2)To compile all WebSphere Commerce JSP files, run the below command
JspBatchCompiler.sh -enterpriseapp.name "WC_instance_name" -webmodule.name "Stores.war" -compileToWebInf false -cell.name " cellname" -node.name " nodename" -server.name "server1"
3)To compile all of the WebSphere Commerce JSP files for your site, omit the -webmodule.name "Stores.war" option.
Monday, December 30, 2013
JDK, JRE, JVM
JVM:Java Virtual Machine (JVM) is an abstract computing machine.
JRE:Java Runtime Environment (JRE) is an implementation of the JVM.
JDK:Java Development Kit (JDK) contains JRE along with various development tools like Java libraries, Java source compilers, Java debuggers, bundling and deployment tools.
JDK (Java Development Kit):
1)Java Developer Kit contains tools needed to develop the Java programs, and JRE to run the programs. The tools include compiler (javac.exe), Java application launcher (java.exe), Appletviewer, etc… Compiler converts java code into byte code. Java application launcher opens a JRE, loads the class, and invokes its main method.
2)You need JDK, if at all you want to write your own programs, and to compile the m. For running java programs, JRE is sufficient. JRE is targeted for execution of Java files i.e. JRE = JVM + Java Packages Classes(like util, math, lang, awt,swing etc)+runtime libraries. JDK is mainly targeted for java development. I.e. You can create a Java file (with the help of Java packages), compile a Java file and run a java file.
JRE (Java Runtime Environment):
1)Java Runtime Environment contains JVM, class libraries, and other supporting files. It does not contain any development tools such as compiler, debugger, etc. Actually JVM runs the program, and it uses the class libraries, and other supporting files provided in JRE. If you want to run any java program, you need to have JRE installed in the system .
2)The Java Virtual Machine provides a platform-independent way of executing code; programmers can concentrate on writing software, without having to be concerned with how or where it will run.
3)But, note that JVM itself not a platform independent. It only helps Java to be executed on the platform-independent way. When JVM has to interpret the byte codes to machine language, then it has to use some native or operating system specific language to interact with the system. One has to be very clear on platform independent concept. Even there are many JVMs written on Java, however they too have little bit of code specific to the operating systems.
4)If u just want to run applets (ex: Online Yahoo games or puzzles), JRE needs to be installed on the machine.
JVM (Java Virtual Machine):
1)As we all aware when we compile a Java file, output is not an ‘exe’ but it’s a ‘.class’ file. ‘.class’ file consists of Java byte codeswhich are understandable by JVM.
2)Java Virtual Machine interprets the byte code into the machine code depending upon the underlying operating system and hardware combination.
3)It is responsible for all the things like garbage collection, array bounds checking, etc… JVM is platform dependent.
4)The JVM is called “virtual” because it provides a machine interface that does not depend on the underlying operating system and machine hardware architecture. This independence from hardware and operating system is a cornerstone of the write-once run-anywhere value of Java programs.
5)There are different JVM implementations are there. These may differ in things like performance, reliability, speed, etc. These implementations will differ in those areas where Java specification doesn’t mention how to implement the features, like how the garbage collection process works is JVM dependent, Java spec doesn’t define any specific way to do this.
openDS Installation and configuration step by step in windows
1)Download openDS Directory server compreseed file from the follwing url https://opends.java.net 2)Extract the commpressed file and exucute the setup.bat script for windows . 3)Now you are in OpenDs quick setup wizard , click on NEXT button

4)Please enter server settings like hostname of your machine, port , Root Distinguished name & password . 5) Click NEXT buttoon after entering the neccessary fields as shown in below screenshot .

6)Here you have to select standalone server option as we are installing now as standalone sever and click NEXT button

7)Provide the Directory data Distniguish Name (DN) . i have configured the Directory data DN as dc=webservicesm,dc=com . 8)click on NEXT button .

9)Review the cofiguration and Mark the start the server checbox to start the server after Clickinh on FINISH button .

10)Atter Clicking on finsh button you can see the openDS conrol panel. 11)Please provide password as we have confiugred the password in step 4 .


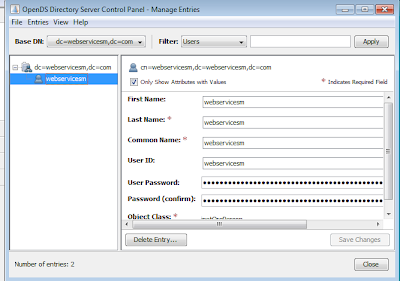
15) Click on Distinguish Name in left side panel .

16)Right Click on Distinguish Name and select the create user option to create the user as shown below . 17)Fill the fields as show below and clik on SAVE button.

17)your user(webservicem)entry has been successfully created in openDS .

Saturday, December 28, 2013
Enable Websphere ( WAS ) Admin Console security with Standalone Ldap Registry
1)I have installed openDS as standalone ldap server and Created a primary adminstrataor user webservicesm in openDS Direct server .
2) websphere provides a security wizard to set up the security .
Login into was admin console and go the the below navigation in let side panel
security ---> Global security ---> securiry configuration Wizard
3) Click on the securiry configuration Wizard button.
4) Now you will be on Specify extent of protection , Leave the screen option set as default and Click on NEXT button .


5) Here you will select which type of repository you wish to use . select the Standalone LDAP Registry and Click on NEXT button .

6))provide primary administrator user name as webservicesm created in step-1 and ldap server config details .

7)Summary page of ldap configuration and click on FINISH Button


9)Login in Was admin console with webservicesm Standalone Ldap Registry user .

Enable Websphere ( WAS ) Admin Console security with Local Operating System
1)Create a local user as show below in windows MyComputer-->rightClick--->Manage--->Local Users and Groups --->users--->rightClick--->New User


Enable Websphere ( WAS ) Admin Console security with Standlone Custom Registry
1) websphere provides a security wizard to set up the security .
Login into was admin console and go the the below navigation in let side panel
security ---> Global security ---> securiry configuration Wizard ---> Click on the securiry configuration Wizard button. 2) Now you will be on Specify extent of protection , Leave the screen option set as default and Click on NEXT button .

3) Here you will select which type of repository you wish to use . select the standlone custom registry and Click on NEXT button .

4)Now we need to create a folder called fileRegistry under and create a files under fileRegistry folder as user.props and group.props .
"user.props" file content as below:
webservicesm:webservicesm:101:101:Websphere Administrator
"group.props" file content as below:
admins:101:webservicesm:Administrative group
5)In configure standalone Custom Registry page type webservicesm in the primary admininstrative user name and two propertiles shown as below screen shot .
Properties file to point
usersFile :WAS_HOME/fileRegistry/user.props
groupsFile :WAS_HOME/fileRegistry/group.props
After pointing the above properties click on NEXT button

6)Save the Configuration changes .

7) Login in admin console with webservicesm user and pasword updated in step 5

Login into was admin console and go the the below navigation in let side panel
security ---> Global security ---> securiry configuration Wizard ---> Click on the securiry configuration Wizard button. 2) Now you will be on Specify extent of protection , Leave the screen option set as default and Click on NEXT button .

3) Here you will select which type of repository you wish to use . select the standlone custom registry and Click on NEXT button .

4)Now we need to create a folder called fileRegistry under

6)Save the Configuration changes .
7) Login in admin console with webservicesm user and pasword updated in step 5
Enable Websphere admin console security
There are four types of registries in WAS to enable admin console security as below :
1)Standalone Ldap Registry : LDAP defined users and groups reguires for LDAP configuration
Please go through the below link to enable was admin security using Standalone Ldap Registry http://jeeservers.blogspot.in/2013/12/blog-post_28.html
2)Local Operating System :Specifies the Registry with Local Operation System >/br>
Please go through the below link to enable was admin security using Local Operating System http://jeeservers.blogspot.in/2013/12/enable-websphere-was-admin-console.html
3)Standalone Custom registry:Custom registry based on java code implementation
Please go through the below link to enable was admin security using Standalone Custom registry http://jeeservers.blogspot.in/2013/12/was-admin-security-with-standlone_28.html
4)Federated Repositories:Managing users and grooups across multiple respositories using a virtual realm
Thursday, December 26, 2013
WebSphere Application Server Profiles V7
Types of profiles : The WebSphere Application Server installation process simply lays down a set of core product files required for the runtime processes. After installation, you need to create one or more profiles that define the runtime to have a functional system. The core product files are shared among the runtime components defined by these profiles.
1)Application server profile
2)Deployment manager profile
3)Custom profile
4)Cell profile
5)Administrative agent profile
6)Job manager profile
Application server profile : The application server profile defines a single standalone application server .
The profile consists of one cell, one node, and one server
The server has a dedicated administrative console.
Deployment manager profile : The deployment manager profile defines a deployment manager in a distributed server environment. Although you can conceivably have the Network Deployment package and run only standalone servers
A cell for the administrative domain
A node for the deployment manager
A deployment manager with an administrative console
No application servers
WebSphere Application Server V7: Working with Profiles on Distributed Systems
After you have the deployment manager, you can:
Federate nodes built either from existing application server profiles or custom profiles.
Create new application servers and clusters on the nodes from the administrative console.
Custom profile : A custom profile is an empty node, intended for federation to a deployment manager. This type of profile is used when you build a distributed server environment. You use a custom profile for these purposes:
1. Create a deployment manager profile.
2. Create one custom profile on each node on which you will run application servers.
3. Federate each custom profile to the deployment manager, either during the custom profile creation process or later by using the addNode command.
4. Create new application servers and clusters on the nodes from the administrative console.
Cell profile :
Cell profile is actually a combination of two profiles: a deployment manager profile and an application server profile. The application server profile is federated to the cell. The deployment manager and application server reside on the same system. This type of profile lets you get a quick start with a distributed server environment and is especially useful for test environments that typically have all nodes on one test system.
Administrative agent profile:
An administrative agent profile is created on the same node as the standalone servers and can only manage nodes on that server. The node configuration for each standalone server is totally separate from any other servers on the system, but it can be managed using the administrative console on the administrative agent.
Job manager profile(New in V7): The job manager is a new server type that was added to support flexible management. A job manager is defined by a job manager profile.
To participate in flexible management, a standalone application server first registers itself with the administrative agent. The administrative agent must then register the node for the application server with the job manager. If a deployment manager wants to participate in an environment controlled by a job manager, the deployment manager registers directly with the job manager; no administrative agent is involved in this case.
The main use of the job manager is to queue jobs to application servers in a flexible management environment. These queued jobs are pulled from the job manager by the administrative agent and distributed to the appropriate application server or servers.
Websphere Commerce utilities (acpload , config server )
ACPLOAD (Access Control Policies) Utility
The acpload utility loads the XML files containing the main access control policies into the appropriate databases.
The acpload utility does not unload access control policies.
To delete or remove components of a policy, administrators can use the Organization Administration Console to perform these tasks
Syntax : /WC_installdir/bin//acpload.sh defaultAccessControlPolicies.xml
config_server.sh utility
This utility starts the Configuration Manager server. The Configuration Manager server must be started before starting the Configuration Manager client.
/WC_installdir/bin/config_server
The above command starts the configuration Manager server .
Tuesday, December 24, 2013
Apache with Tomcat Integration
Installing Apache by using GUI Mode in windows and integration with Tomcat:
1)Install apache from the Source path :“E:\Education\Softies dumps\apache_2.2.3-win32-x86-no_ssl”
2)Just simple wizard – follow next button
3)Hit the URL: http://webservicesm.blogspot.in:80/ in any browser
4)You will get “it works!”
Installing Tomcat by using GUI Mode in windows:
1)Install Tomcat from the Source path ” :\Education\Softies dumps\apache-tomcat-6.0.14”
2)Double click on it
3)Go to TOMCAT_HOME/bin and run or double click startup.bat
4)Hit the URL to get the Tomcat Console http://webservicesm.blogspot.in:8080/ in browser
Steps to integrate Apcahe with Tomcat :
1)Stop both servers(Apache & Tomcat )
Download “Tomcat-connectors-1.2.27-src.zip” and unzip it.
Copy the following files from “E:\Education\tomcat-connectors-1.2.27-src\tomcat-connectors-1.2.27-src\conf”
uriworkermap.properties
workers.properties
workers.properties.minimal
To tomcat Conf folder “C:\Program Files\Apache Software Foundation\Tomcat 6.0\conf”
2. Download tomcat connector “mod_jk-1.2.27-httpd-2.2.10.so” from the following path
http://archive.apache.org/dist/tomcat/tomcat-connectors/jk/source/
3. Rename from “mod_jk-1.2.27-httpd-2.2.10.so” to “mod_jk.so” (by default it will come)
4. Copy “mod_jk.so” and paste in here – “C:\Program Files\Apache Software Foundation\Apache2.2\modules”
Configure Apache
1. Open “httpd.conf” from “C:\Program Files\Apache Software Foundation\Apache2.2\conf”
2. Add the following code snippet at the end of the file “httpd.conf”
LoadModule jk_module "C:/Program Files/Apache Software Foundation/Apache2.2/modules/mod_jk.so"
JkWorkersFile "C:/Program Files/Apache Software Foundation/Tomcat 6.0/conf/workers.properties"
JkLogFile "C:/Program Files/Apache Software Foundation/Tomcat 6.0/conf/from_apache_mod_jk.log"
#JkLogLevel info
#JkLogStampFormat "[%a %b %d %H:%M:%S %Y]"
#Send servlet for context /examples to worker named ajp13
#JkMount /examples ajp13
# Send JSPs for context /examples/* to worker named ajp13
#JkMount /hello/* ajp13
#DocumentRoot /webapps/hello
ServerName localhost
JkMount /hello ajp13
JkMount /hello/* ajp13
Configure Tomcat
3. Open worker.properties from:
C:\Program Files\Apache Software Foundation\Tomcat 6.0\conf \conf\worker.properties and add the below enteries into it.
worker.list=ajp13
worker.ajp13.port=8010
worker.ajp13.host=localhost
worker.ajp13.type=ajp13
4. Open “server.xml” from “C:\Program Files\Apache Software Foundation\Tomcat 6.0\conf\server.xml”
5. Add the below enteries in "Server" and "Host " tags
listener classname="org.apache.jk.config.ApacheConfig" modjk="C:/Program Files/Apache Software Foundation/modules/mod_jk.so"
6. Map the doc base by below enteries in "host" tag
Host name="localhost" appBase="webapps"
unpackWARs="true" autoDeploy="true"
xmlValidation="false" xmlNamespaceAware="false
Context path="/" docBase="webapps/(application name)" debug="1" reloadable="true"
7. Start both the server’s and deploy
Bad Request & Request Header Is Too Large Error in Glassfish servers
"BAD REQUEST" on webpage while downloading multiple files from application and in the logs "REQUEST HEADER IS TOO LARGE" exceptions as below
Error
[#|2013-04-12T12:34:47.769+0000|SEVERE|oracle-glassfish3.1.1|com.sun.grizzly.config.GrizzlyServiceListener|_ThreadID=25;_ThreadName=Thread-2;|GRIZZLY0040: Request header is too large.
java.nio.BufferOverflowException
at com.sun.grizzly.tcp.http11.InternalInputBuffer.fill(InternalInputBuffer.java:765)
at com.sun.grizzly.tcp.http11.InternalInputBuffer.parseHeader(InternalInputBuffer.java:669)
at com.sun.grizzly.tcp.http11.InternalInputBuffer.parseHeaders(InternalInputBuffer.java:555)
at com.sun.grizzly.http.ProcessorTask.parseRequest(ProcessorTask.java:881)
at com.sun.grizzly.http.ProcessorTask.doProcess(ProcessorTask.java:692
Solution :
To over come the "REQUEST HEADER IS TOO LARGE" issue we have to change the Buffer size from 8KB (default) to 1 MB (depending on requirement)
Below is the navigation path to update the buffer size
Configurations ---> server-config ---> Network Config ---> Transports ---> tcp ---> Buffer Size
Resetting Websphere commerce Administrator account
You can unlock or enable WebSphere Commerce account gets locked or disabled due to some reasons :
Resetting a Site Administrator's account
If the account is a Site Administrator's account or any other user account, run the following SQL statements:
1)Open Sqldeveloper using the user name and password for your WebSphere Commerce database and execute the below query .
UPDATE USERREG SET STATUS=1, PASSWORDRETRIES=0 WHERE LOGONID='weservicesm'
Resetting non Site Administrator's account :
1.Open the orgAdministration Console.
2.Click Access Management > Users > Find User
3.Double-click the user account or select the user account from the list and click Change.
4.Select Enable in the Account status field.
5.Click OK.
Forgot Siteadmin Password in Websphere Commerce (websphere commerce forgot password)
Forgot Siteadmin Password
Please find the process to change the password :
1)First register your new id using your application url .
2) Open Sqldeveloper using the user name and password for your WebSphere Commerce database and get the salt code and password from the register New user id using below query
SELECT LOGONPASSWORD , SALT from USERREG where LOGONID='newwcsadmin'
3)Update the salt code and loginpassword in below query for your siteadmin user
UPDATE USERREG SET LOGONPASSWORD '705356594E664D7A7773453D202020202020202020202020202020', STATUS = 1, PASSWORDEXPIRED = 1 , PASSWORDRETRIES =0 , SALT = 'webservicesm' WHERE LOGONID='wcsadmin';
4)Commit the changes.
Monday, December 23, 2013
Weblogic Interview Questions :
1. What is meant by channeling and define the default channeling?
2. What is the advantage of cluster constraints?
3. Explain the role of machines in weblogic?
4. Define the importance of Node manager and write the procedure involved in configuring the node manager?
5. What is meant by Keep-alive (on) and Keep alive time-out in HTTP Server?
6. Explain the logging mechanism in weblogic?
7. Can we do partial deployment in weblogic cluster?please explain in detail..
8. Can we separate managed servers from the cluster? explain in detail?
9. Define the 2 phase commitment protocol?
10. Define the steps involved in FTP a file from your local desktop to client machine?
11. How do we monitor the weblogic application server health?
12. What is meant by JDBC statement cache and the default value?
13. What Is meant by default config archive and how many back-ups would be created?
14. What is meant by connection leak and how to set the default connection time out ?
15. What is the use of execute queues?
16. What is meant by dispatch policy?
17. How to check whether a cluster multicast address is available or not ?
18. What is the default location of the log files?
Differences between classes12.jar, ojdbc5.jar,ojdbc6.jar and ojdbc14.jar
Jar File - Supported Java Version
classes12.jar - for Java 1.2 and 1.3
ojdbc5.jar - for Java 1.5
ojdbc6.jar - for Java 1.6
ojdbc14.jar - for Java 1.4 and 1.5
We need to add above jar's in server class-path based on JAVA version to connect datasource to the oralce Database
Friday, December 20, 2013
Supported web browsers for WebSphere Commerce tools
You can access the WebSphere Commerce tools, such as the Management Center or WebSphere Commerce Accelerator, only from a supported browser on a machine that runs a Windows operating system on the same network as your WebSphere Commerce machine. To use the WebSphere Commerce tools, use one of the following browsers:
Management Center
Mozilla Firefox
FEB1+ : Version 3.0
FEP5+ :Version 3.6 or any later Extended Service Release
Microsoft Internet Explorer
Version 7.0 and 8.0
Version 9.0
WebSphere Commerce Accelerator, WebSphere Commerce Administration Console, and WebSphere Commerce Organization Administration Console
Microsoft Internet Explorer 7.0 and 8.0
Note: WebSphere Commerce Accelerator is compatible with Internet Explorer 8 only when it is in Compatibility Mode.
Information Center
Mozilla Firefox 3.6 or Firefox 7.0
Microsoft Internet Explorer 7.0 and 8.0
Prior versions of these browsers do not support the full function of the WebSphere Commerce tools.
Websphere Commerce Maintneance packs & Feature Packs
1) Maintneance packs .
2) Feature packs .
Maitenance pack : WebSphere Commerce maintenance, includes fix packs and APARs (Authorized Program Analysis Report).
APARs : An Authorized Program Analysis Report, or APAR, is a formal report to IBM development of a problem caused by a suspected defect in a current release of an IBM program. If IBM development is able to confirm the existence of the defect they will update the APAR with any known workarounds and perhaps an indication of which future release .
Fixpack :Each WebSphere Commerce fix pack contains fixes for multiple APARs, to correct issues with the WebSphere Commerce product
Applying Fix Pack 1 to Version 7.0.0.0 changes the version to 7.0.0.1. Fix packs are cumulative; for example when you install Fix Pack 2 you get all the fixes in both Fix Pack 1 and Fix Pack 2. Applying Fix Pack 2 to Version 7.0.0.0 changes the version to 7.0.0.2.
Feature Packs : WebSphere Commerce feature packs include NEW FEATURES to improve your WebSphere Commerce solution. These additions add new functionality to the WebSphere Commerce product. The feature pack differs from a fix pack in that it does not contain fixes to the base WebSphere Commerce product.
Each WebSphere Commerce feature pack contains fixes for multiple APARs to correct issues with the WebSphere Commerce product.
Minimum fix pack levels for feature packs
The following are the fix pack requirements for each WebSphere Commerce Version 7 feature pack:
Source URL : http://pic.dhe.ibm.com/infocenter/wchelp/v7r0m0/index.jsp?topic=%2Fcom.ibm.commerce.install.doc%2Ftasks%2Ftig_tiginstall_fixpack.htm
| FEATURE PACK ----- FIX PACK REQUIREMENTS |
|---|
| FEP1----WebSphere Commerce version 7.0.0.1 or higher |
| FEP2----WebSphere Commerce version 7.0.0.2 or higher |
| FEP3----WebSphere Commerce version 7.0.0.3 or higher |
| FEP4----WebSphere Commerce version 7.0.0.5 or higher |
| FEP5----WebSphere Commerce version 7.0.0.6 or higher |
| FEP6----WebSphere Commerce version 7.0.0.7 |
Wednesday, December 18, 2013
Could not bind to port 10070 (Address already in use) in Iplanet webserver?
Error:
ADMIN3603: Error while starting the server:
warning: CORE3283: stderr: In jk_init.
startup failure: could not bind to port 10070 (Address already in use)
failure: HTTP3127: http-listener-1: http://localhost:10070: Error creating socket (Address already in use)
failure: HTTP3094: 1 listen sockets could not be created
failure: server initialization failed
Solution:
The above error occured due to port conflicts .
Note : Make sure to check if there is any another process being used by the same port in the server if not below
1)Issue the follwing commnad to find the iplanet child processes :
ps -ef |grep webservd or ps -ef |grep InstanceName
2)kill all the child processes relatd to that instance using kill- 9
3)start the sever instaces which will resolve the issue.
Websphere Commerce Model-View-Controller design pattern (MVC)
The model-view-controller (MVC) design pattern specifies that an application consist of a data model, presentation information, and control information. The pattern requires that each of these be separated into different objects.
The model (for example, the data information) contains only the pure application data; it contains no logic describing how to present the data to a user.
The view (for example, the presentation information) presents the model's data to the user. The view knows how to access the model's data, but it does not know what this data means or what the user can do to manipulate it.
Finally, the controller (for example, the control information) exists between the view and the model. It listens to events triggered by the view (or another external source) and executes the appropriate reaction to these events. In most cases, the reaction is to call a method on the model. Since the view and the model are connected through a notification mechanism, the result of this action is then automatically reflected in the view.
Most applications today follow this pattern, many with slight variations. For example, some applications combine the view and the controller into one class because they are already very tightly coupled. All of the variations strongly encourage separation of data and its presentation. This not only makes the structure of an application simpler, it also enables code reuse.
Tuesday, December 17, 2013
Websphere Commerce Access control problems
Troubleshooting: Missing policy for a new view A new view is missing an access control policy.
Problem: Added a new view without an accompanying policy.
Indication: An application error is displayed. In the trace.log file the SiteAdminCanDoEverything policy is logged, but the user is not a Site Administrator.
WC_ACCESSCONT PolicyManagerlmpl.isAllowed isAllowed? User=123;Action=MyNewView;
Resource=com.ibm.commerce.command.HttpForwardViewCommandlmpl;Owner=-2001;
Resource Ancestor Orgs=-2001,-2001; Resource Applicable Orgs=-2001
WC_ACCESSCONT PolicyManagerlmpl.isAllowed Found PolicyName:
SiteAdministratorsCanDoEverything; PolicyType: 2;PolicyOwner:-2001
WC_ACCESSCONT PolicyManagerlmpl.getPolicyApplicableOrgs Policy Applicable Orgs=-2001
WC_ACCESSCONT PolicyManagerlmpl.evaluatePolicy Evaluating PolicyName:
SiteAdministratorsCanDoEverything
WC_ACCESSCONT d PolicyManagerlmpl.isAllowed PASSED?=false
Solution:
1)Create a policy for the view. Refer to Adding a new view using existing policies .
2)Load the policy using the acpload utility.
3)Update the Registry.
Source URL: http://pic.dhe.ibm.com/infocenter/wchelp/v7r0m0/topic/com.ibm.commerce.developer.doc/refs/raxtroubleshoot.htm Share
Saturday, December 14, 2013
Starting and Stopping VNC Server in Solaris machines
1)export PATH with the below command
export PATH=$PATH:/usr/X11R6/bin:/usr/openwin/bin
2)Issue the command as follows to start VNC server
vncserver
3)Issue the command as follows to stop VNC server
vncserver –kill :1
Why failure is so wonder full ?
Most people are afraid of failure. Some so afraid that don't want to attempt anything that involves the risk of failure. But anybody and everybody who has ever succeeded did it by failing first.
Most of us often choose to have a safe ride in life and we usually follow the general life cycle i.e. taking birth, studying, getting a job, doing whatever we are required to do and leave this earth without being known.
But there were few gems who chose to continue on their path even after failing many a times. One can call them genius today but they were born as normal person and they completely changed the perspective of defining life.
What if they had stopped at the first rejection? The fifth? Or the tenth?
The measure of success can be shown by how many times someone keeps going despite hearing only no.
Different ways to take thread dumps in WebLogic Server
WebLogic Server (WLS) and Java offer several ways to generate thread dumps, which are listed below in order of preference. It’s always better to obtain the thread dumps by using operating system (OS) commands rather than by using Java classes or the Administration Console, because if the console is hanging, users won’t be able to connect to it to issue thread dumps.
1.Use operating system commands to get the thread dumps: On Windows OS, thread dumps can be created by
+ the thread dumps are generated in the server stdoutOn Unix, first identify the process ID (pid) using ps -ef | grep java, then run kill -3 pid
2.Using beasvc:
o service_name is the Windows service that is running the server instance (e.g. mydomain_myserver)
o td_pathname is the full path and the name of the file in which the thread dump will be generated into
beasvc -dump -svcname:service_name -log:td_pathname
3. Using weblogic.WLST:
java weblogic.WLST
connect("username","password","t3://:")
threadDump()
the thread dump will be generated in Thread_Dump_AdminServer.txt
4.From a command line or shell, a thread dump can be generated via the following command:
java weblogic.Admin : -username -password THREAD_DUMP
The thread dump will be generated in the server stdout defined
5.From the WLS Administration Console a thread dump can be created by navigating to Server -> -> Monitoring -> Dump threads stack . This method could lead to truncated thread dumps or incomplete thread dump.
6.From the JRockit command line: jrcmd print_threads
Compressed (zipped) Folder is invalid or corrupted after downloading from IE8
This problem may occur if HTTP compression is enabled for .ZIP files on the web server that the .ZIP file is downloaded from. When HTTP compression is enabled on the web server, the .ZIP file is encoded before being sent to Internet Explorer. Once the HTTP-compressed .ZIP file is received by the client, Internet Explorer passes the .ZIP file directly to the program configured to un-zip the .ZIP file without first decoding the HTTP compression .
Solution :
How to disable HTTP compression (in IE6, 7 and 8) .
1. Open Internet Explorer
2. Go to Tools > Internet Options > Advanced
3. Scroll down to HTTP 1.1 settings, and uncheck the "Use HTTP 1.1"
4. Click OK
This change will fix the issue. Please clear the cache and try in new session
Resetting the Websphere Commerce Configuration Manager Password
1)./wcs_encrypt.sh NEWPASSWORD under WC_installdir/bin directory.
where NEWPASSWORD is new password for the Configuration Manager.
Two encrypted versions of the new password will be generated:
o ASCII encrypted string
o HEX encrypted string
2)Open the PwdMgr.xml file in the WC_installdir/instances directory in a editor .(before doing changes please take a backup of PwdMgr.xml )
3)Modify LoginPassword in the the PwdMgr.xml file with the ASCII encrypted password from step 1 and save your changes.
Friday, January 18, 2013
IPLANET WEBSERVER RESTRICT BROWSER SUPPORT :
By default iplanet will support all browser buy we can restrict the client browser by adding the below entries in obj.conf file
For IE :
<If $browser =~ "MSIE">
NameTrans fn="rewrite" path="/msie.html"
</If>
For Mozilla :
<If $browser =~ "Mozilla">
NameTrans fn="rewrite" path="/mozilla.html"
</If>
Changing the browser name in the above entry and we can use same for other Browser also .
For IE :
<If $browser =~ "MSIE">
NameTrans fn="rewrite" path="/msie.html"
</If>
For Mozilla :
<If $browser =~ "Mozilla">
NameTrans fn="rewrite" path="/mozilla.html"
</If>
Changing the browser name in the above entry and we can use same for other Browser also .
Thursday, January 17, 2013
Configuring Reverse Proxy
Reverse proxy is a proxy that appears to be a web server (origin server) to clients but in reality forwards the requests it receives to one or more origin servers. Because a reverse proxy presents itself as an origin server, clients do not need to be configured to use a reverse proxy. By configuring a given reverse proxy to forward requests to multiple similarly configured origin servers.
In this article I will describe how to configure reverse proxy in Sun Java System Web Server 7.0 console , CLI and Manually .
Type -1
Configuring Reverse Proxy Using CLI by Manually Editing the obj.conf file :
NameTrans fn="map" from="/test" name="reverse-proxy" to="http:/test"
Object ppath="http:*"
Service fn="proxy-retrieve"
Object
<Object name="reverse-proxy">
Route fn="set-origin-server" server="http://:port"
Object
Type -2
Configuring Reverse Proxy Using CLI :
wadm>create-reverse-proxy --config test --vs test --uri-prefix=/ --server=http://:port
Type -3
Configuring Reverse Proxy Using Administration Console
Using the Administration Console, select Configurations > Virtual Servers > Content Handling > Reverse Proxy tab. Click New.
Specify values for the following parameters:
URI — The reverse proxy URI
Server URL — Comma separated server URLs of all the machines in the cluster separated by comma. If multiple values are given, the server will distribute load among the specified servers.
The format for entering the server URL is hostname:portnumber. For example, http://:port
Click the OK button.
Click the Deployment Pending link in the top right of the screen to deploy the modified configuration and to apply changes to the configuration.
Click the Deploy button.
Deployment successful message appears.
Wednesday, August 15, 2012
Sun java System Webserver (iplanet) browser information in logs
Add below partameter in log format :
"%Req->headers.user-agent%"
you can find below Access logs after adding the above paramter server.xml or customlog format through console and following with restart
Chrome :
127.0.0.1 - [13/Aug/2012:15:25:26 +0000] "GET /webservicesm HTTP/1.1" 200 "Mozilla/5.0 (Windows NT 5.1) AppleWebKit/537.1 (KHTML, like Gecko) Chrome/
Mozila :
127.0.0.1 - [13/Aug/2012:15:26:02 +0000] "GET /webservicesm HTTP/1.1" 200 "Mozilla/5.0 (Windows NT 5.1; rv:11.0) Gecko/20100101 Firefox/11.0"
Internet Explorer :
127.0.0.1 - [13/Aug/2012:15:26:24 +0000] "GET /webservicesm.html HTTP/1.1" 200 "Mozilla/4.0 (compatible; MSIE 7.0; Windows NT 5.1; Trident/4.0; BTRS129225)"
Tuesday, August 14, 2012
Configuring cache controls for static files in Sun Java System Web Server 7
Edit the obj.conf as mentioned below:
Add these below lines after AuthTrans and NameTrans
directive to set up 10 days of cache from current access time
if path="~"
ObjectType fn="set-variable" insert-srvhdrs="Expires:$(httpdate($time + 864000))"
ObjectType fn="set-cache-control" control="public,private,must-revalidate,max-age=$(httpdate($time + 864000))"
/if
Thursday, August 2, 2012
Patches to be installed: [119963-20] on solaris to install Orcle IPlanet 7.0.9
ERROR : Orcle IPlanet 7.0.9 on solaris installation will Abort with the below error
Aborting the installation.
Jul 24, 2012 8:53:57 AM com.sun.web.installer.common.dialogs.CustomDirectorySelectionPanel isDisplayComplete
INFO: Installing Oracle iPlanet Web Server 7.0.9
Jul 24, 2012 8:53:58 AM com.sun.web.installer.web.dialogs.PatchDetectionListener displayWarning
INFO: The following patches need to be installed for the server installation to complete successfully.
Patches to be installed: [119963-20]
CAUSE:
showrev -p Prints only the revision information about patches
user@localhost1 ~ $ showrev -p | grep Patchid
Patch: 119963-08 Obsoletes: Requires: Incompatibles: Packages: SUNWlibC
the above information says SUNWlibC patches are not installed in the OS
SOLUTION:We need to install SUNWlibC Patch at Opertation system Level
http://docs.oracle.com/cd/E19146-01/821-1835/gduwe/index.html
Subscribe to:
Posts (Atom)